
A cute way to make individual charcuterie servings for parties, these charcuterie cones have quickly transformed into a special event favorite! These single serving hand-held cones are filled with delicious charcuterie favorites.

When to Make Charcuterie (Grazing) Cones
The individual cones are perfect for parties and get togethers! They’re often used for events such as: corporate events/office snacks, cocktail parties, picnics, baby showers, bridal parties, and bridal showers.
Affordable and easy to transport, DIY charcuterie cones can be customized for the occasion – just be sure to find event complementary skewers and ribbons to tie around them. See images, these cones were wrapped in white ribbon with white heart skewers for a bridal party 😊. If you love these, you might also want to check out giftable mini individual charcuterie boxes, another great individual serving charcuterie option.

Serve Enough Food for Your Guests
This recipe is different from the others in that it makes 7.25” large cones. Standard charcuterie cones have typically been made in a 5” medium size and I found them to be very small. While the 5” cones only have room for a couple crackers, a couple pieces of meat, a couple olives, and a couple pieces of fruit, these 7.25” cones fit enough food to make a complete appetizer!
What Kind of Paper Is Used for Charcuterie Cones?
For these charcuterie cones, I used biodegradable ecofriendly cones made from pine wood (a thick paper). Most cones you find on Amazon will also be made from wood. You also have the option to make your own cones from parchment paper and wrap them in computer paper, colored paper, or a fun paper design. Learn how to wrap them in the link above.

The only other tools needed are skewers to hold the ingredients and ribbon/cording to wrap the cone. In these cones, I used a piece of silver cording complemented with a white ribbon for spring/bridal events. Bamboo skewers were paired with white heart skewers to hold the charcuterie ingredients.
What to Include in a Charcuterie Cone

Charcuterie cone ingredients can be chosen from any of your traditional charcuterie favorites! See the recipe below for what was used in the pictured cones. Here are some delicious options that you can use for deciding what you’d like in your cones:
- Crispy Italian breadsticks
- Long bars of chocolate and/or long cookies such as wafers
- Figs, apricots, and/or other dried fruits
- Mozzarella balls, fresh basil leaves, cherry tomatoes
- Pickles spears or quartered cucumbers slices
- Fresh fruit: strawberries, blackberries, cherries, oranges (blood oranges add a pretty color)
- Cheese cut into long triangles/wedges (harder cheeses such as Asiago work well)
- Cheese cut into cubes (well-loved favorites such as Monterey jack or cheddar work well)
- Thyme, sage, or other fresh herbs with large leaves
- Salami and pepperoni slices folded into quarters (for easy skewers)
- Green and black olives
How to Assemble & Layer Your Charcuterie Cone
Charcuterie cone assembly is simple! Begin by threading the skewers with the chosen ingredients. Then create your paper cones (or take out the pre-bought cones). Add the cones into a holder or glass to be in an upright position for assembly or assemble them lying down against the table. Tie a decorate ribbon and/or cording around them if desired.
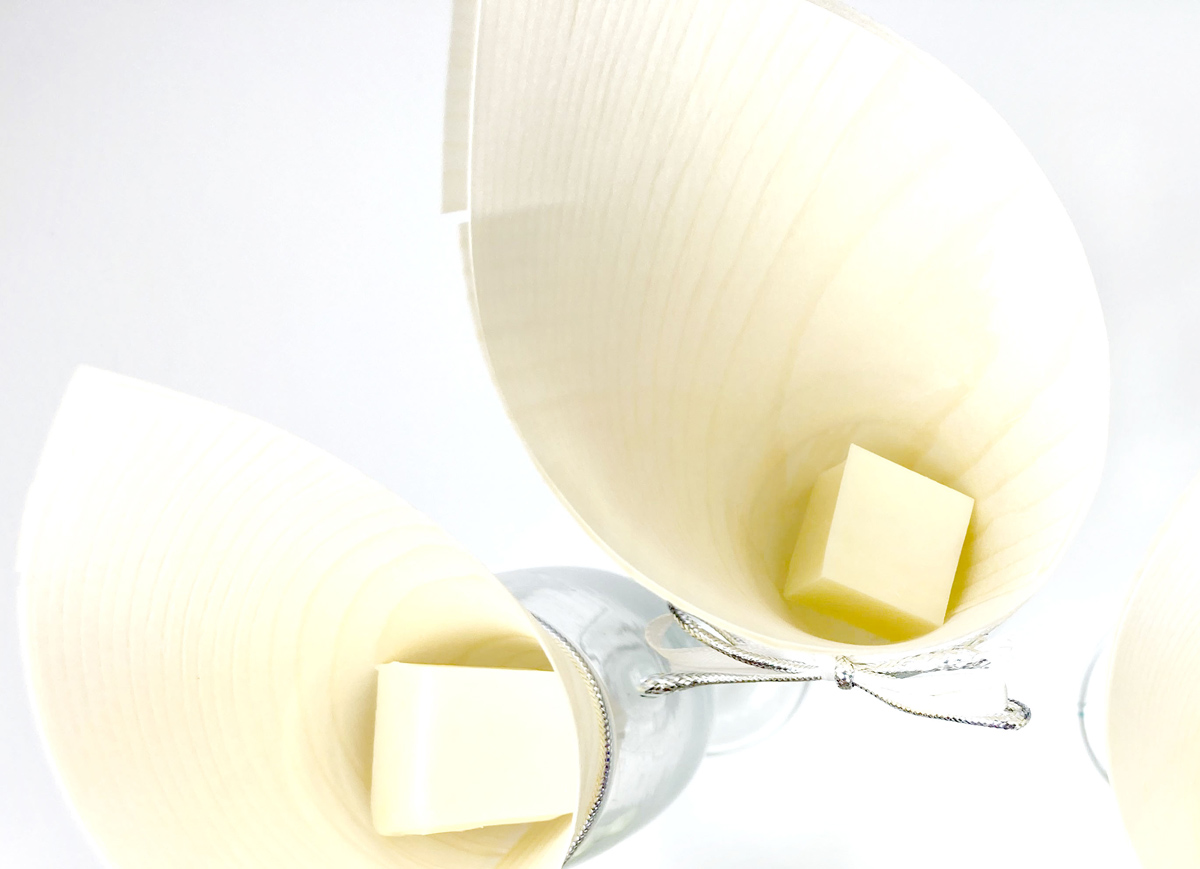
Begin adding the ingredients into the cones with this quick trick – add one large cheese cube into the base of the cone to provide a base to stick the skewers into.
Line any loose items such as crispy breadsticks, cucumber or pickle spears, long cheese triangles, and or long cookies or chocolate bars along the backside of the cone. Herbs can also go in now. Add in skewers, poking them slightly into the cheese cube as needed for balance. Finish by wedging in any loose items such as full strawberries and orange slices.
*For cone assembly, a wide range of colors, flavors, and textures works best!
How to Serve Your Cone
Many classic charcuterie cone stands are intended for 5” cones. My recommendation for these larger sized cones are to serve them in a heavier champagne glass. They are fun, elegant, and affordable as many already have these glasses readily available in their home.
FAQ
Absolutely, I’m gluten free as well. In this recipe I used Gluten Free Breadsticks, Glutino Wafers, and Trader Joes Chocolate Bars.
Yes! Just skip the chocolate bars and wafers, and swap the cheese out for some vegan cheeses.
Yes! Just skip the chocolate bars, wafers, meats, and swap the cheese out for some vegan cheeses. Additional vegetables such as carrot and celery sticks or nuts can be added for extra ingredients are desired.
It is recommended to assemble these directly prior to serving. Just wash, cut, and add any prepared fruits together in one container, meats and cheese in another, vegetables in a third, and dry ingredients in the last. Don’t forget to grab the glasses, cones, ribbon, and skewers! Upon arrival, assemble the cones.
These are preferable to be made directly before serving. The meat, vegetables, and fruits, however, can be cut, prepped, and added into containers up to 1-2 days in advance.
Charcuterie cones are great for parties and get togethers such as corporate events/office snacks, cocktail parties, picnics, baby showers, bridal parties, and bridal showers.
More Charcuterie Fun
Love charcuterie? There is more than one way to serve individual charcuterie. Get creative! Try these charcuterie cones, individual charcuterie (aka grazing) boxes, JARcuterie, charcuterie in glasses or mugs, individual charcuterie boards, cute/smaller takeout boxes, or containers, and much, much more!

Charcuterie is an amazing and versatile dish as is looks impressive, is trendy, can be used as an appetizer or gift, is easily customized for food allergies and/or picky eaters, and is just plain fun!
Here’s to assembling beautiful charcuterie and regaining our sparkle together,
✧❈✯✦Jenn✦✯❈✧

Individual Charcuterie Cones
Ingredients
Supplies (for about 12)
Ingredients (works for either size)
- 1 block of Monterey jack or cheddar cheese, cut into cubes
- Crispy Italian breadsticks
- Long chocolate bars
- Rosemary sprigs
- 2 wedges of Asiago cheese, cut into thick slices
- 2 cucumbers, cut into wedges
- 8 ounces salami slices, each piece folded in half twice
- 5 ounces pepperoni slices, each piece folded in half twice
- 2 cups olives, drained (if from can)
- 1 package dried apricots
- 1 cup figs, quartered
- 3 cups cherries
- 3 cups blackberries
- 3 cups 3 cups strawberries
- 2 blood oranges, cut into half-circle slices
Instructions
- Thread the skewers with the chosen ingredients.
- Create your paper cones (or take out the pre-bought cones).
- Add the cones into a holder or glasses to be in an upright position for assembly or assemble them lying down against the table.
- Tie a decorate ribbon and/or cording around them if desired.
- Add one large cheese cube into the base of the cone to provide a base to stick the skewers into.
- Line loose items along the backside of the cone: crispy Italian breadsticks, chocolate bars, a sprig of rosemary, Asiago cheese wedges, and cucumber wedges.
- Add in skewers (salami pepperoni and olives, apricots and figs, cherries and blackberries), poking slightly into the cheese cube as needed for balance.
- Finish by wedging in any loose items desired such as full strawberries and orange slices.

These are great for parties and entertaining guests. You can customize them to your liking a bit and they show off well ! We liked the variety.